

RAISED standards
Raised beds help to improve soil conditions and are a great way to start growing vegetables. Benedict Vanheems explains the benefits and how to set one up
CHANCES ARE THAT even if you’re not a passionate gardener you may well have heard people talking about raised beds. Raised beds are simply growing beds that are raised above the general ground level. How far they are raised depends very much on what you are growing in them. The question, of course, is why go to all the bother of making a raised bed when most plants have been growing quite happily at ground level for millions of years?
Raised bed gardening has taken the horticultural world by storm as many of us have fallen in love with growing some of our own vegetables. Raised beds offer distinct advantages over traditional methods of kitchen gardening, allowing easier management, better soil conditions and an ordered approach to this sometimes chaotic hobby.
Order, order!
Late winter into early spring is the perfect time of year to set up a raised bed for the growing season ahead. Perhaps the biggest advantage to raised beds is their ability to compartmentalise the various vegetable groups. This allows for tailored crop management and the rotation of different crop groups to prevent any build up of pests and diseases while encouraging the optimum use of soil nutrients. Their generally compact and precise size also enables a sprawling plot to be broken down into more manageable sections.

You can make your own bed from recycled wood
Of course, not all of us have the luxury of a large garden. But even in bijoux spaces a raised bed will create the perfect, self-contained productive area. For example, a bed that’s just one metre square would give more than enough room to grow some of your own salad or stir-fry leaves, saving a pretty penny on those over-priced supermarket bags. Whenever I am asked where those new to vegetable growing should begin I always reply salads. More than any other crop salads provide the perfect home-grower’s delight, being very quick to grow, easy to look after and saving on the grocery budget; raised beds are the best way to grow them.
Optimum conditions
Raised beds don’t just look smart, they also have distinct advantages for the crops growing in them. Soil that is raised above ground level will drain better, a valuable quality during wet periods and one that ensures they warm up earlier than the surrounding ground at the start of the growing season. This can also be helpful in gardens lumbered with heavy clay, where the added drainage will open up the list of vegetables that will happily grow on such a plot.

The elevated growing position allows an early start for crops
Most raised beds will be of a size that they can be sown, tended and harvested from the sides. This means a maximum width of around 1.2m, so you are never more than a 60cm (or two foot) reach to the centre of the bed. The advantage of this is that the soil in the bed need never be trod on, ensuring an open structure is maintained; crop roots will have a far healthier environment into which to spread.
The organic matter that you add to your beds will be concentrated exactly where it is needed – none of it needs to be wasted on paths or redundant spaces, as would be the case on a traditional plot. And because the beds are raised, it’s easier on your back too, as there’s less stooping!
How to make one
Raised beds come in literally all shapes, sizes and heights. Opt for a minimum height of about 15cm for a bed that will grow salad leaves and shallow-rooted crops. Beds with a height of 30cm will be good for just about any other crop, including root vegetables such as parsnips, while a minimum height of 45cm will be needed for deeper-rooting potatoes. Potatoes are perhaps best grown separately in open ground or special potato growing sacks.
You can make your own raised bed quite easily. All you will need is four planks of new or recycled wood, cut to the desired dimensions of your bed. Screw these together, or screw them to corner posts (these will be hammered into the ground) for added stability. A bed of around 1x1m would be a good starting size, with perhaps a maximum length of 2m to allow you to get around the bed with ease. You could also make a temporary bed using old bricks, laid three or four courses high in a stretcher-bond pattern. This can easily be dismantled at the end of the growing season or if you simply want a change of shape.
Of course, you don’t have to be a DIY expert to set up a raised bed. Several purpose-sold kits make this setup process a doddle. Some of the most popular kits feature plastic walls that are slotted together using dowels – nothing more complicated than large-scale Lego!

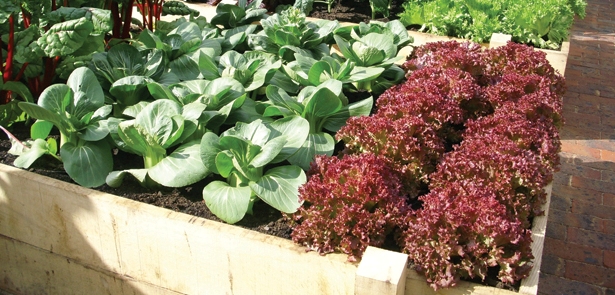
Raised beds are ideal for quick-growing salads and stir-fry veg
Before you put into place any raised bed it is essential to clear the ground of weeds, taking great care to dig up all traces of roots from more vigorous perennial weeds. With the ground cleared it may be worth covering the base of the bed area with cardboard, which will suppress any further weed growth while allowing free drainage through it. Don’t worry about this layer of cardboard – it will rot down within a few months (just long enough to exhaust and kill off any remaining weeds).
It isn’t necessary to have a perfectly level bed but it does help for neatness and even drainage. Bank up and excavate soil as necessary and use a spirit level if you want to be really precise. With all crop maintenance taking place from outside of the raised bed, the ground surrounding your bed can be laid to paths. Mown grass paths look attractive, while a frame of weed-suppressing membrane topped with bark chippings will offer an immediate and low-maintenance finish.
Coming to life
With your bed set up, it’s time for the fun part – filling it and growing in it! For most vegetables a simple 50:50 mix of quality topsoil and multipurpose compost will do the trick. The compost will add fertility, while the topsoil offers substance and support for the roots. If the soil below is very heavy (slow-draining clay) then consider adding a few handfuls of grit to the mix to further improve drainage. Many garden centres offer multi-buy discounts on compost, so it needn’t cost the earth to fill your bed/s. One plea, however, is to avoid compost containing peat, which destroys valuable wildlife habitat and contributes to climate change through the release of carbon dioxide. As gardeners we want our impacts to be positive, both for us, our garden wildlife and the wider environment.

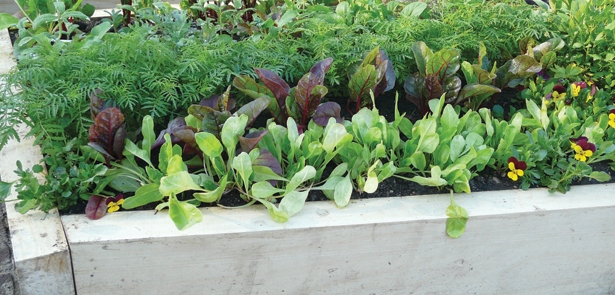
A bed of salad just two weeks after sowing
The only decision now is what to grow in your raised bed. Opt for quick-growing vegetables if you are new to growing your own. Salad and stir-fry leaves are ideal, as are radishes, shallow-rooting carrots, spinach and other tasty, compact delights (see ‘10 raised bed crops’ below). Bear in mind the final height that each vegetable will grow to; to avoid overshadowing always put taller crops to the north side of the bed. Avoid anything that is too vigorous and runs the risk of smothering neighbours – a compact raised bed is no place for rambunctious bullies!
Make maximum use of space by intercropping slower-growing crops such as shallots with speedy fellows like radishes. The latter will be long gone before the extra space is needed. As many of the recommended crops are so quick to grow you will want to maintain momentum and, hence, keep harvests coming by sowing a new line of crop as soon as another is finished. Remember that bare ground is a wasted opportunity, so repeat sow as opportunities present themselves.
General care
Always sow according to seed packet instructions. In most cases it is better to sow quite thinly (sparsely) because most seeds are likely to germinate. Once the seedlings have popped up you can remove excess seedlings to leave the correct space between each plant – again, let the seed packet instructions be your guide.
Keep your bed weed-free by regularly picking out any rogue seedlings. These should be easily recognisable because they will be growing outside of the neat rows of vegetable seedlings and will look quite different. Weeding shouldn’t take too long – pick over the bed every time you inspect it and they will never get a chance to dominate. Water your raised bed in dry weather and particularly while plants are still young. Raised beds are likely to need more water than the surrounding ground owing to their free-draining nature.

Thin out germinated seedlings to their final spacings
With surprisingly minimal effort a raised bed set up now will keep you in fresh produce all summer long. You could be enjoying your first cut of home-grown leaves as soon as April. And once you’ve discovered the delight of produce fresh from your garden you will be hooked!


Don't Miss!
-
Lifestyle
Peterborough-based charity launches digital tool...

-
Lifestyle
Olivers BabyCare | Buying for baby

-
Lifestyle
Melanie Richard’s Hair & Beauty

-
Lifestyle
It’s Christmas!

-
Lifestyle
A Park for all!

-
Lifestyle
Melanie Richard’s Hair & Beauty

-
Lifestyle
J Neville Opticians launch exclusive new range

-
Lifestyle
Summer’s here – and holidays are back at last!
